반응형
애플코딩 보고 따라 처봄
https://www.youtube.com/watch?v=CojyGfCMvuU
<!DOCTYPE html>
<html lang="en">
<head>
    <title>Document</title>
</head>
<body>

    <canvas id="canvas" width="300" height="300"></canvas>

    <script type="importmap">
    {
      "imports": {
        "three": "https://unpkg.com/three@0.141.0/build/three.module.js",
        "GLTFLoader" : "https://unpkg.com/three@0.141.0/examples/jsm/loaders/GLTFLoader.js",
        "OrbitControls" : "https://unpkg.com/three@0.141.0/examples/jsm/controls/OrbitControls.js"
      }
    }
  </script>

  <script type="module">
    import {GLTFLoader} from 'GLTFLoader';
    import * as THREE from 'three';
    import { OrbitControls } from 'OrbitControls';

    let scene = new THREE.Scene();
    let renderer = new THREE.WebGLRenderer({
        canvas : document.querySelector('#canvas'),
        antialias : true
    });

    renderer.outputEncoding = THREE.sRGBEncoding;

    let camera = new THREE.PerspectiveCamera(30, 1);
    camera.position.set(0,0,5);

    scene.background = new THREE.Color('white');
    //let light = new THREE.DirectionalLight(0xffff00, 10);
    //scene.add(light);

    let loader = new GLTFLoader();

    let controls = new OrbitControls( camera, renderer.domElement );
    controls.rotateSpeed = 1.0; // 마우스로 카메라를 회전시킬 속도입니다. 기본값(Float)은 1입니다.
    controls.zoomSpeed = 1.2; // 마우스 휠로 카메라를 줌 시키는 속도 입니다. 기본값(Float)은 1입니다.
    controls.panSpeed = 0.8; // 패닝 속도 입니다. 기본값(Float)은 1입니다.
    //controls.minDistance = 5; // 마우스 휠로 카메라 거리 조작시 최소 값. 기본값(Float)은 0 입니다.
    //controls.maxDistance = 100; // 마우스 휠로 카메라 거리 조작시 최대 값. 기본값(Float)은 무제한 입니다.

    loader.load('shiba/scene.gltf', function(gltf){
        scene.add(gltf.scene);

        function animate(){
          requestAnimationFrame(animate)
          //gltf.scene.rotation.y += 0.01;

          renderer.render(scene, camera);
          controls.update();
        }

        animate();
    });
  </script>
</body>
</html>
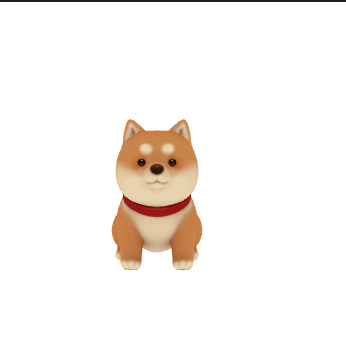
결과물 스샷
'프로그래밍 > Web' 카테고리의 다른 글
| [Web]Wrap Text Around Circle using Html & CSS Shape (0) | 2021.01.19 |
|---|---|
| [JavaScript] 날짜 연산 (0) | 2020.06.10 |
| [JavaScript]date format 포맷지정 (0) | 2020.06.10 |
| [Web]Responsive Navigation Bar | Html CSS and jQuery따라치기 (0) | 2019.01.19 |
| [Web]자바 스크립트 Boolean형변환 (0) | 2019.01.09 |